Tuesday, December 23, 2014

Final papers and Christmas sewing

I made it through the first semester of my PhD. It was quite a ride. The month of December has flown by with papers to write, grading to complete, exams to proctor and gifts to sew! Some days I didn't sleep very much but I got it all done!

My friends and I had a wonderful Christmas dinner on the 14th of December. It was our first time hosting Christmas in our new house! In preparation, I did a little Christmas crafting; I made a holiday felt garland.

All it took was some pinking shears lots of felt and some time!

Here is a close up of the garland.The technique is really simple! I sewed down the centre each circle. I let 4 stitches go in between each circle to give them some space, they hang better that way. 

 I used painters tape to mark the space for the circles so the stitching would be more of less in the middle. 

Here it is installed in my dinning area. Later on I added some Christmas lights to give it extra Christmas flair and it looks great!

After our christmas dinner we had a gift exchange. I was secret Santa to my friend Theresa and made her 3 open wide zipper pouches (tutorial here). I wanted them to be really personalized so I added pieced tops to make each one unique. 

Macbook for scale ;)

Here is the detail on the medium bag, I used a lot of scraps here,it kind of felt like doodling with fabric

Mini flying geese for the smallest bag

I tried my hand at making printed labels with great success, here is the biggest bag with the label ready to sew. I'll have more on the labels in a future post, but let me just say sewing them on after the bags were completed was not the best idea. I ended up having to open up the lining to make it easier. Save yourself the headache, plan ahead and sew them to the lining before assembly!!

All three bags with their labels ready to be sewn.


The bags were a great success, Theresa loved them! What do you think?


Happy holidays everyone

Vivianna

Tuesday, November 25, 2014

A little lamb for my little nephew

My life has changed a lot recently, I got married last year, bought a house this year and started a PhD this fall in a city 2 hours away from that house, my family and friends. All these changes have been amazing in many ways, although being far from my friends and family has definitely been the hardest part. 
By far the change that took me the most by surprise was the birth of my nephew, now you might be thinking, didn't I have 9 months to prepare for this? Yes, you're right, my sister is not a candidate for the show "I didn't know I was pregnant". The day he was born was a little surprising, I was away at school. I had warned my twin sister that of all the days for her to go in labour, Tuesday is the absolute worst (for me, of course that is the most important part of her labour, right? my schedule) and of course that is the day she went into labour (thank you Murphy's law!)
So here I was at the library getting updates by text message from my friend Theresa who was with my sister at the beginning of her labour. I felt excited, and also extremely far away and also sad. Such a mix of emotions to feel. I knew there was nothing I could really do to help my sister, but I knew that I wanted to be there to be part of this awesome moment. When her water broke I was kind of incredulous, I had been in denial until then, sure in the fact that this could not happen without me being there! I remember thinking, really this is happening now, when I just can't be there?? And I was also thinking, wow this is the moment!! How amazing I will have a nephew soon! I was in charge of the telephone tree to announce to everyone that the big moment was on hand! A very exciting and fun job. It is perhaps the best news you can call anyone with!  
Did I mention that while all this was happening, I was at the library to work on a very important presentation for the next day? Well I was, I'm sure you can tell that I was distracted to say the least! It was a torturous 12 hours for me, feeling far away and stressed about a presentation that I didn't want to be doing in the first place. I am still amazed I got through that presentation the next day on 3 hours of sleep. You guessed it, I only really got down to work after my nephew was born, meaning I went to bed at 4am! I like to joke that my sleep deprivation that night was in solidarity with my sister, her fiance and my nephew, but the truth is that it was part of a struggle that I am almost always losing, a work-life balance.  
The call that I got from my sister about an hour after she gave birth was very special and I will always remember it, the first photos were incredible. So the birth of my nephew was not all that surprising, but the thing that did surprise me was how much I love him. He's truly the greatest baby on earth. Yes, you are also right in thinking that I am completely biased in this opinion, but thats ok, its my opinion right? My friends had a bet as to who would cry when they held him, and I "won" that honour. He is truly perfect.  

What did I do to prepare for the birth of my perfect nephew? I made him a stuffed animal and baby blanket of course!!! Check out little Lamby, you can find the great pattern here.

The pattern is relatively easy, it just requires some patience and precise sewing. if you look at his face below you will see that I embroidered all his facial features, I did that because this stuffed lamb is for a baby, and I wanted to avoid any choking hazards. I also pre-washed all my fabrics to get rid of unhealthy residues and dyes. The harder part of this pattern was sewing his "hair", it is so curvy, I really had to sew slowly and I did have to get my friend Mr. Seam ripper involved a time or 2. The longest part was definitely the embroidery, but that is probably because I am a very novice embroiderer. 


So here is Lamby's face all ready to be sewn to the rest of his body. I unfortunately I did not take any photos of the previous steps, but let me tell you that it was very fun to pre-stuff the little arms and legs and to make the little ears!!


The hardest part of this was sewing all together when the limbs were all tucked inside. It was very bulky and at times I had trouble shoving little Lamby in the right position to be sewn. (See the pattern for more information on this step).

Here he is all sewn together and stuffed part way and almost ready to be hand sewn shut. (if you look at the right side of his torso, you will see the opening) Again apologies for not getting step by step photos, I was just to excited to see him stuffed!


Here is Little Lamby chilling at my dinning table, watching netflix patiently waiting for my nephew to be born.
I made a blanket for my nephew, that I knew would be super useful while he was still in a stroller (so for a while yet). It is very easy to make, a cotton fabric on top and a pretty orange minky on the bottom, just sew with right sides together, leaving a 3 inch opening to reverse it. Then stitch it shut. I also added a line of stitching all the way around about half an inch from the edge to hold the sides together and also to make it look more finished. Thats it, it took me about an hour. 
Here is my finished gift, a baby blanket and a cute little lamb stuffed animal!
Lamby likes his new blanky, but don't worry, he knows he will have to share it with my nephew.

What do you think of Lamby? have you every made a cute gift for your family or friends? Share it in the comments :)
Vivianna


Saturday, November 15, 2014

A Marxist gingerbread man

The end of the week and weekend so far has not been a very productive studying week for me. I started out with great hopes that I would slay the academic dragon this weekend, as well as make progress on my christmas quilt, but unfortunately that has not materialized.

I bought some great fabric on Thursday. I can't wait to use it and see the different blocks I have planned take shape in my quilt.


Yesterday I had the pleasure of spending time with my sister, step-mom, step-sister and my amazing nephews! They are only 2 months apart, so it was a baby afternoon. It was a great change of pace and a nice reminder that there is more to life than school.

On my way home, I knew that I would have to work all night to catch up on school work, but after dinner when It came time to sit down and read yet another article that uses marxist theory, I decided to push it off until today and let Future Viv handle it. So I sat down at my machine and started piecing together my first gingerbread man.


He turned out great but he is a lot smaller than what i had planned, so I will have to adjust my design for the finished quilt, using some filler squares. More on that when I have time to sketch it out. The pattern for Mr Cookie comes from Lori Holt and is part of an instagram sew along calls #haveyourselfaquiltylittlechristmas. She has many great patterns, here is her blog

I was tired and a little irritable while piecing him, probably an indication that my sewing time was not for relaxing but for procrastination. And so, with every stitch my anxiety over getting my work done increased. And yet when he was all done, I could not bring myself to go to bed early. Instead, I watched videos about free motion quilting and looked up pretty quilting patterns on Pinterest.

So, this morning, Future Viv woke up, she was not impressed with Yesterday Viv's procrastination to say the least. I am at Starbucks, trying to catch up on reading, while the midterm papers I have to grade are weighing heavily on my mind.

Funnily enough, I am reading an article that argues among other things that School is an Ideological State Apparatus that indoctrinates young impressionable children into the ruling ideology in order to reproduce the material means of production.  I am beginning to vaguely understand what this means, which is progress for me. But I find it ironic that this article is in my reading list this week as I am struggling so much with the whole school system.

That's it for now. Not such a fun post, but at least you know where I'm at.

Vivianna


Sunday, November 9, 2014

Relaxing Christmas Quilting


This has been a crazy, exciting and wonderful week! My twin sister gave birth to a beautiful son! I am an aunt for the first time!!! Amidst this wonderful news, I also had a presentation to prepare for on Wednesday and a conference to attend on Friday. It was a busy week filled with trips back and forth between Montreal and Ottawa. By Saturday morning I was completely exhausted and ready to relax a bit. What better way than with a little bit of quilting?

Ever since I started quilting, I have wanted to make a Christmas quilt. The holidays can be such a fun time to be with family and celebrate traditions. With the birth of my beautiful nephew, I can only hope that this quilt will come to represent fun holiday traditions and family time. So, this weekend I started my first Christmas quilt and I’m excited to share the process with you!
Photo from original pattern
My inspiration started with this Christmas tree block, it’s so cute and easy; you can find the pattern here.

I purchased the Christmas fabrics I used from Walmart. I had heard that the store carried some fabric, but had never explored that option. I went this week and was surprised to find they had a good selection. It may not be the finest quality fabric that you can purchase from a quilting shop and some may have serious objections to that, but I think that broader tradition of quilting is about working with what you have. If you have beautiful expensive fabrics, that’s wonderful, and maybe your quilt will stay nicer for longer, but less expensive fabrics can also produce great quilts.


So, while I was watching this weeks episode of How To Get Away With Murder, very interesting developments I have to say, I started cutting my fabric. The pattern calls for mainly strips and squares, which is one of the reasons this block is so easy. There are no triangles! 


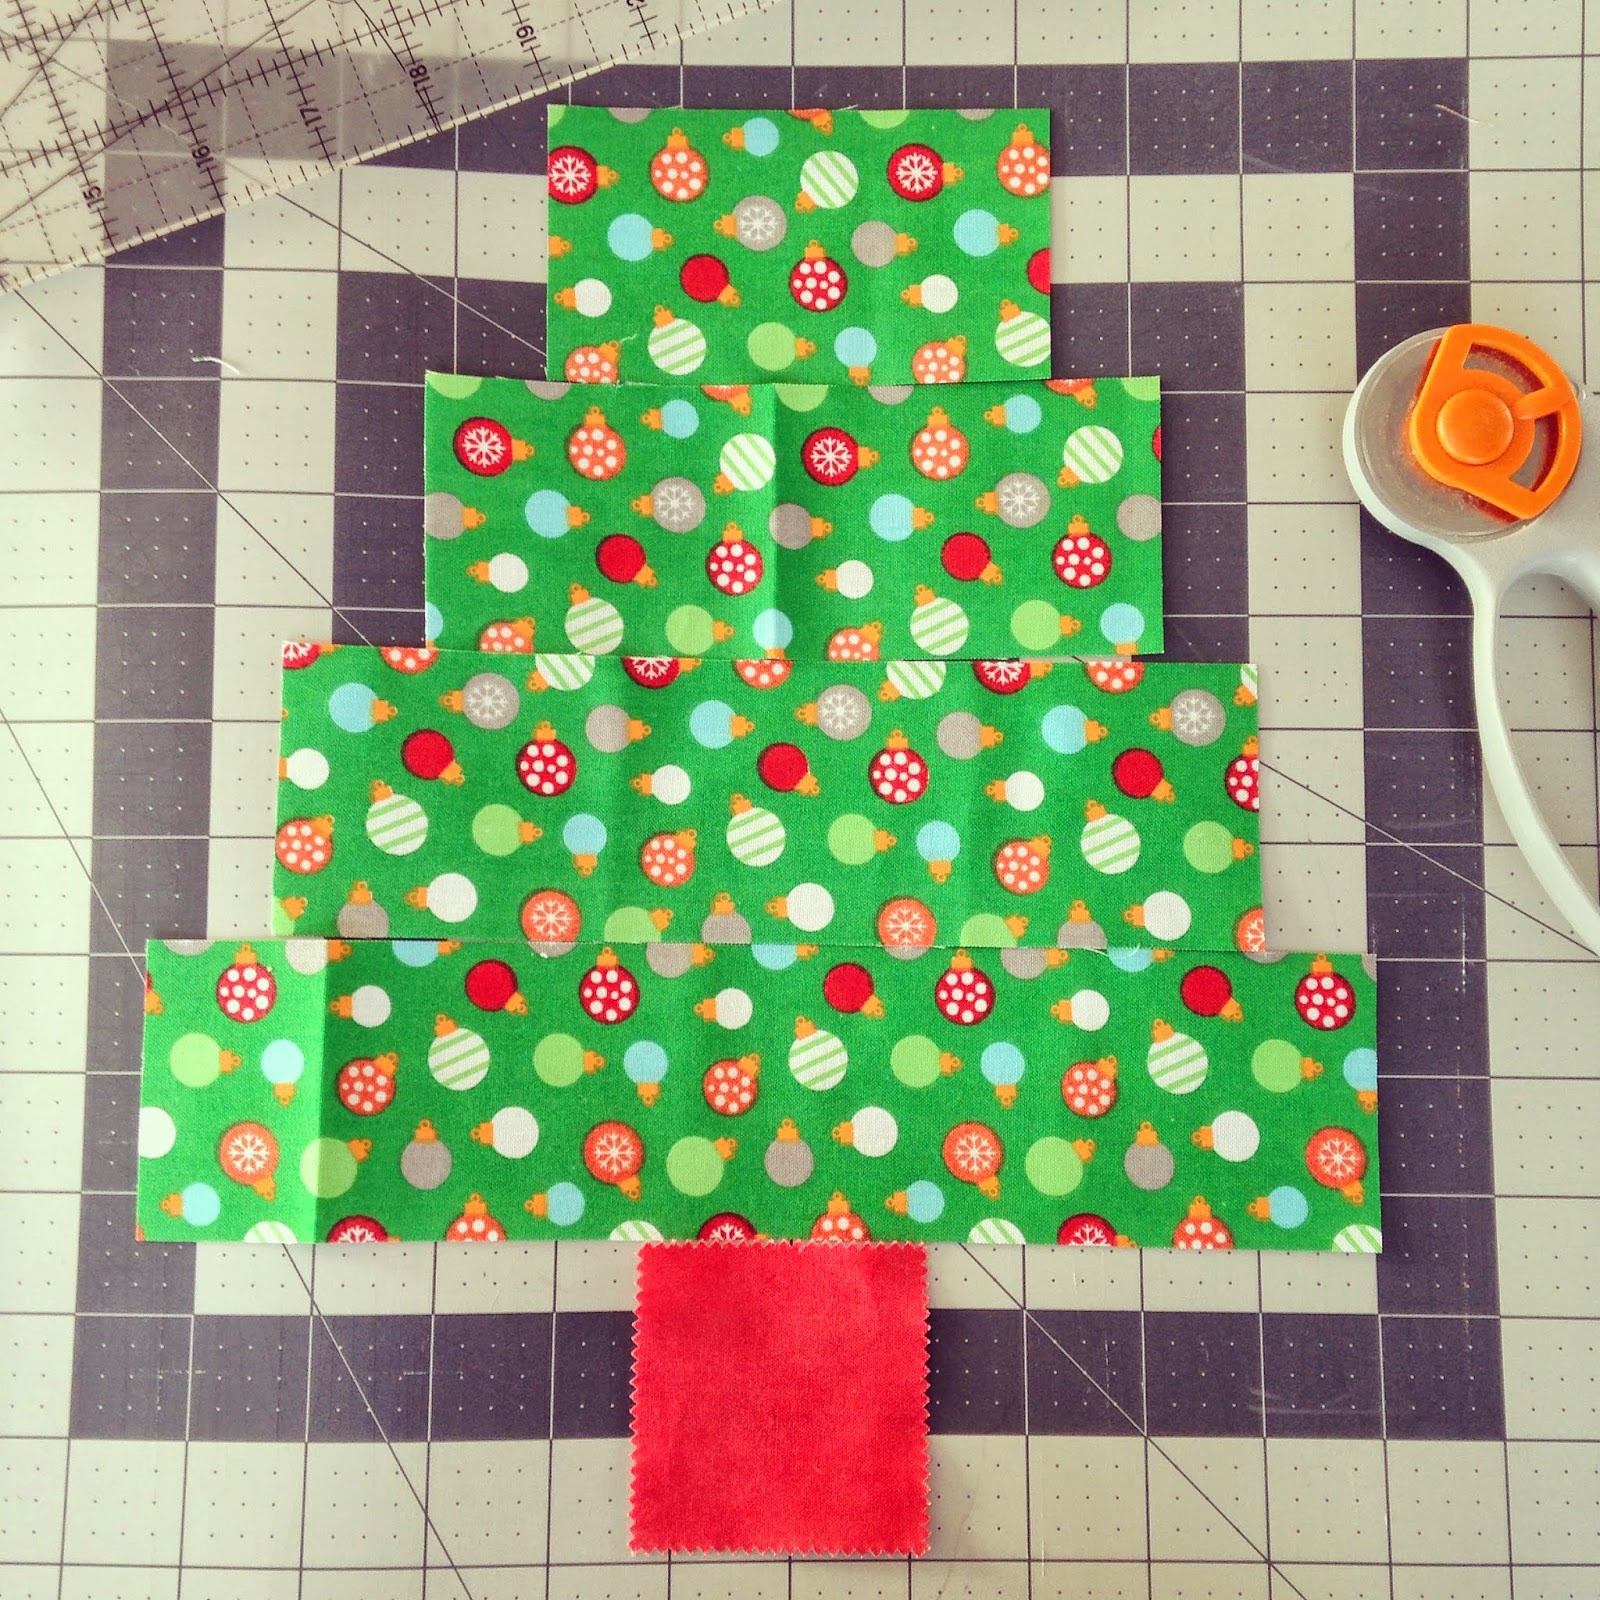
Here are the trees all cut and ready to sew, it was very easy to get to the process. The red one on the right has all the cream pieces that will be make up the background of the tree. 


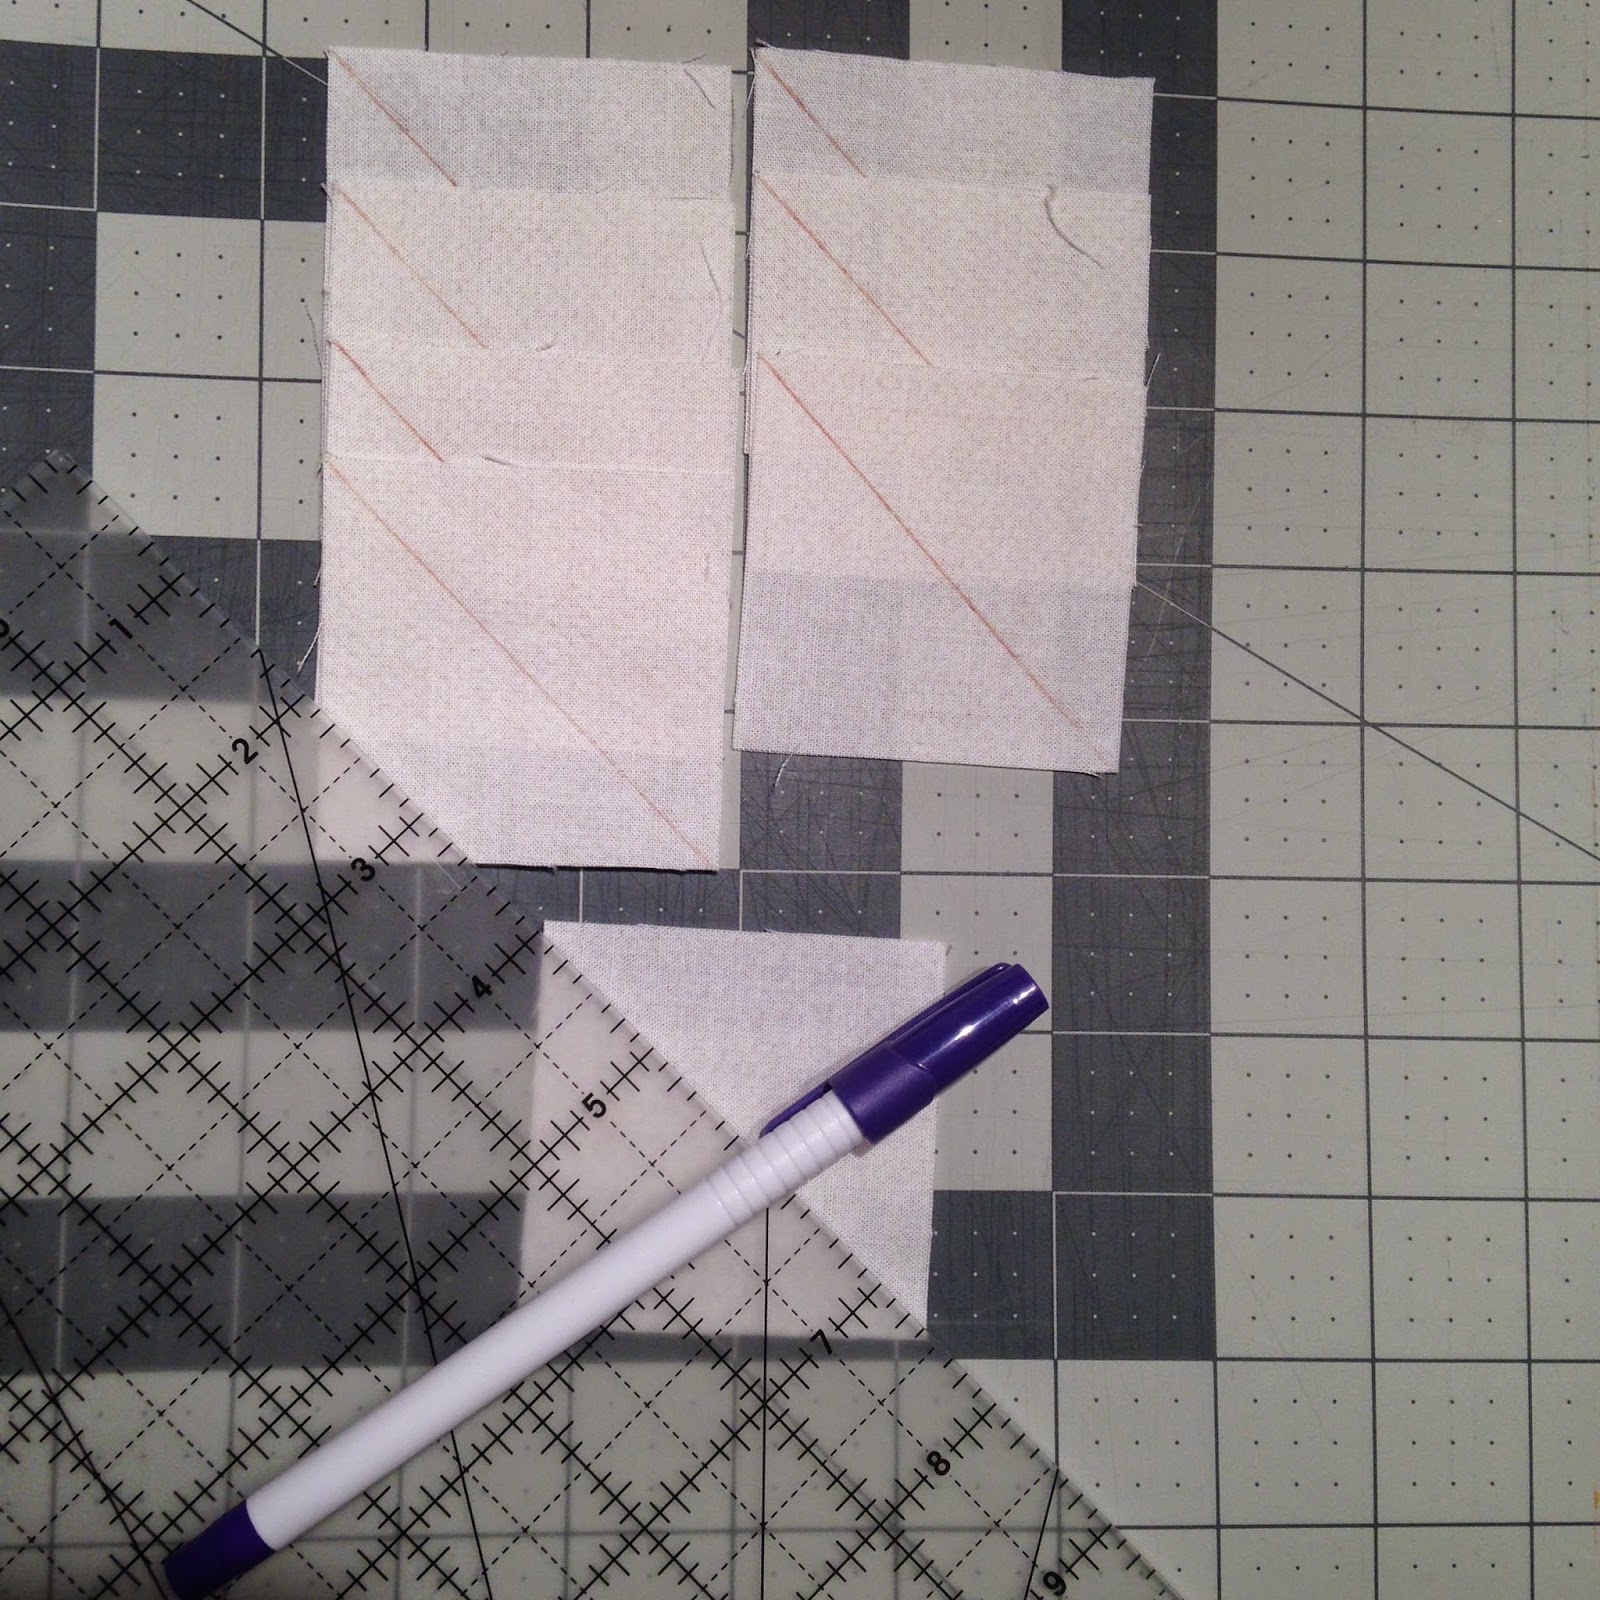
This pattern calls for drawing a diagonal line along 8 of the cream squares that are matched up on each of the tree strips. It is a kind of tedious process, but it makes assembly much faster and so its absolutely worth it.


Of course, my friend Mr. Seam Ripper wanted to get in on the action. I accidentally sewed the tree stump to the wrong side of the tree!! Irritating, but no quilting project is complete without the seam ripper!


Mid-assembly, you can already tell that it's going to be a cute christmas tree!
                     

Here are my trees all finished! I really like how they turned out. I can see my quilt coming together nicely with other fabrics and maybe another block or two mixed in, maybe a star, well see how it goes. I doubt I'll have time to finish this before christmas, but its certainly a step in the right direction! What do you think so far?


Some tips for this pattern:

Choosing the right foot for the job
As I started quilting more, I bought a quilting foot for my sewing machine that has a 1/4 inch guide. It is perfect for certain jobs since it ensure perfect seams. but for others like sewing a diagonal line, my traditional foot is much better.  


The photo with the red fabric has the the regular foot, it works for all types of sewing. The photo with the cream fabric has the quilting foot with the guide. 


Chain piecing
I have found that whenever possible it is so much better to use chain piecing as a technique. The technique calls for sewing each piece right after the other without cutting the thread in between. If you look at the photo on the left above, you will see there is another square right behind the one I am sewing, this is chain piecing. It is much faster and saves a lot of thread! On the right here you will see the 4 pieces I sewed using the chain piecing technique. 


Monday, November 3, 2014

Wedding crafting

I first started really getting into crafting for my wedding, I wanted to give my bridesmaids each a nice, personal gift. I didn't like many of the options available online, I found they were either too expensive or too cookie cutter. So, I decided to make my own! I spent hours on pinterest searching for inspiration and easy fun things I could make.  I decided to sew a cute makeup bag and a customized tote bag for each bridesmaid so that they could put all the other little things I gave them that I thought they may need on the day of my wedding. 


The first item I tackled was the tote bag. The project was simple enough I used a combination of 2 techniques (1 & 2 you can decided which one you prefer, I liked using a stencil for the letters because I don't have a steady hand for painting)


Each small tote bag has the bridesmaid's initial on it. Rather than buying a stencil for the letters, I found a font I liked and printed out each of the letters the size I wanted. Then, this is the long part, I cut each letter out leaving the white paper intact that became my stencil. I reinforced the A's with tape since there wasn't much holding the bar together. For an extra touch for my maid of honour, I added an extra ring on the top left corner of the "G" bag. The bags have been a success and they are still in use today!

The next project was a lot more labour intensive, but absolutely worth it! I made these awesome little bags.  The pattern is available here, it is so easy to use and makes the process enjoyable. 


I chose an individual colour for each bridesmaid that I thought matched their personality. To make them all feel like they are part of a set, I used the same fabric for the top band. It is fabric that comes from a dress I wore to my bachelor graduation, I thought it was nice symbolically. I also chose zippers that went well with the bag as a whole. The primarily yellow bag is mine, I inverted the colours to differentiate them.


After a few hours of sewing and crafting each bridesmaid's tote bag contained an eye mask, kleenex, tic-tacs, hair ties, bobby pins, manicure kit, safety pins and make up bag

Sunday, November 2, 2014

Stressful jewelry roll


Today is the last day of my reading week, the last half of the semester and all the work I have to do before the it ends is looming over me. I should have done more work this week to prevent many late nights that are coming. But, instead of facing that I decided last night to procrastinate some more (because why not?!) and make a jewelry roll for myself. I bought this pattern a few years ago and never got around to trying and I thought it was the perfect quick and easy project for a night of crafting. Sadly, I was mistaken and spent a frustrating evening and afternoon today trying to figure it out.

I almost always watch a movie when I am sewing, something that I can follow by listening and glancing at occasionally. Last night I chose I Give It A Year with Rose Byrne and Ana Farris. It is not a very good movie generally and became very irritating when I kept making mistakes cutting out my pattern! Skip the movie! This afternoon I picked up where I left off sans movie but still lacked focus.


Of course once I was finished with my jewelry roll, it seemed so simple and easy! I plan to make more as Christmas gifts, but alas, this was not a stress-free weekend of sewing. 

Here is the fabric I chose:
The interior fabric is gorgeous, the scalloped stripes are just so cute, but because it is a stripe it was hard to work with and I found myself obsessed with trying to cut and sew everything perfectly straight. This is something to keep in my for your fabric choices. The exterior fabric is one of my favourites lately, and I have made many things with it, as you will see when I share other projects I have worked on. The cotton batting is a 100% cotton and left over from a quilt that I made. The zippers are mismatched only because I didn’t have 2 zippers the same colour! Thankfully they look cute together.

One of the hardest parts of this project was that I needed a zipper foot, which I don’t have. So, I substituted a zipper foot for a rolled hem foot and it worked like a charm!


Here it is all done, I’m pretty happy with it, I think I may make some changes to the pattern for future presents, but all in all I am pleased
I decided to use the interior fabric for the ties and I love the contrast when it's all tied together


Here it is all opened up and ready to use!
 Here it is filled my jewelry, ready to be taken to school with me! 

What do you think?